EXECUTIVE SUMMARY
This project was proposed by Dr. Paavo through a desire to more easily study the benthic sediment layers of the ocean. To do so, he asked us to build a simple and compact machine for use in sediment profile imagery (SPI). Although devices like this already exist, they are all large scale devices that require a ship with a crane to deploy, which is expensive and time consuming.
Instead, he desired a “micro” SPI, which is capable of being deployed from a small vessel that can easily navigate shallow waters. Our interpretation of these requirements was as follows: a less than 10kg device that can easily be deployed by hand by a single person, and can capture 600dpi images in a 20mm deep section of sediment at an underwater depth of up to 30 m. In the end, we ended up with the device seen below in Figure 1.
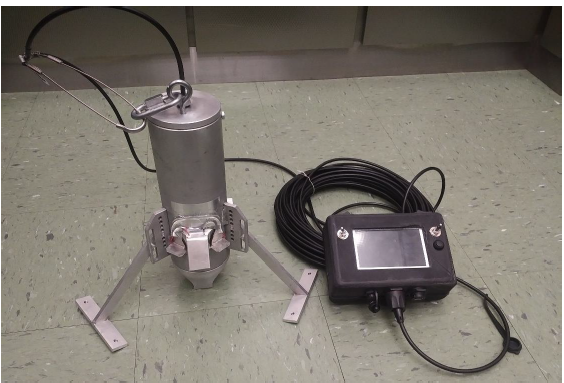
Figure 1: Micro SPI final prototype.
This device has a 50m long tether, and can in theory stay water tight to up to 150m underwater, although it has only been tested in 10m deep water. Our device is also around 5kg in weight, making it easily usable by a single person. Lastly, it has two 8mp cameras, both with a viewing area of approximately 25mm, which should give a theoretical resolution of much greater than 600dpi, although we could not verify the true resolution due to insufficiently detailed calibration charts.
We also added a controller with a screen that is capable of receiving a live video feed from the probe, as well as reviewing previously captured images Therefore, we feel the device meets the requirements previously set out for this project, and has even met some of the “stretch” goals set out by our sponsor. While some features are missing, and the device would be expensive to mass produce in its current state, overall we feel it is a very solid prototype and proof of concept that can refined into a commercial product.
BACKGROUND RESEARCH
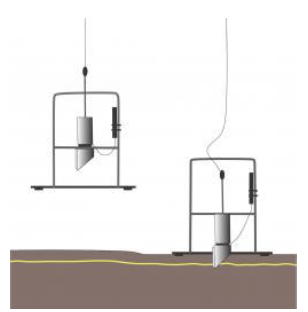
Figure 3: Operational example of the Flanders Marine Institute’s SPI.
See Figure 3 for a schematic of the SPI in operation. In order to push the prism into a variety of different sediment layers, the frame allows for the attachment of “up to 113 kg of lead weights”. Due to the mass of the device, two feet are attached to the frame in order to distribute the weight of the SPI over the sediment layer by increasing surface area.
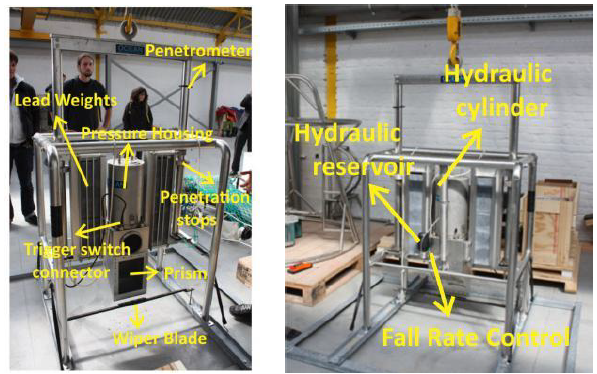
Figure 4: Schematic of Flanders Marine Institute’s SPI components and sub-systems.
According to Flanders Marine Institute, the “camera, electronics, and battery” are located in an aluminum pressure vessel that is kept separate from the prism assembly. Hydraulic cylinders are used to control the rate that the prism is inserted into the sediment layer. This gives the operator control over the insertion rate to prevent the sediment layers from being disturbed during imaging. See Figure 4 for a schematic of the SPI’s components and sub-systems from Flanders Marine Institute.
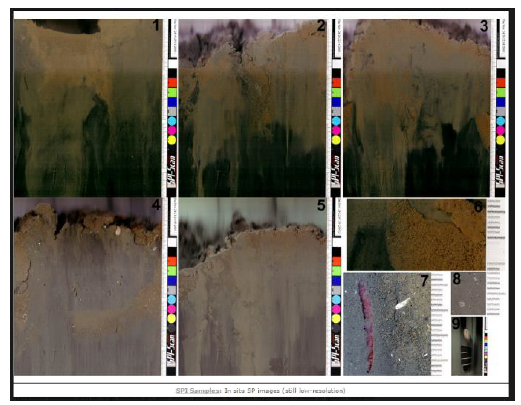
Figure 6: Example sediment profile images from Benthic Science Limited’s SPI-Scan Surveyor.
Figure 6 is an example of the benthic layer photos taken by the SPI-Scan Surveyor from Benthic Science Limited. The photos produced from the SPI-Scan Surveyor “are 210 x 280 mm at a user-selectable resolution of 75-600 dpi requiring 17- 120 sec per scan”. Figure 6: Example sediment profile images from Benthic Science Limited’s SPI-Scan Surveyor. Note that the boundary from the surface the top layer of sediment is displayed in the picture for depth reference.
OBJECTIVES
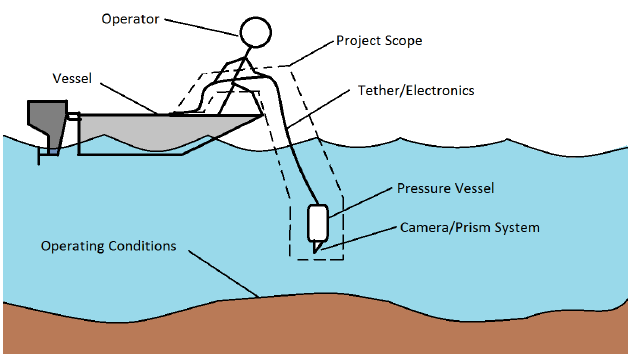
Figure 15: Illustration of the project scope.
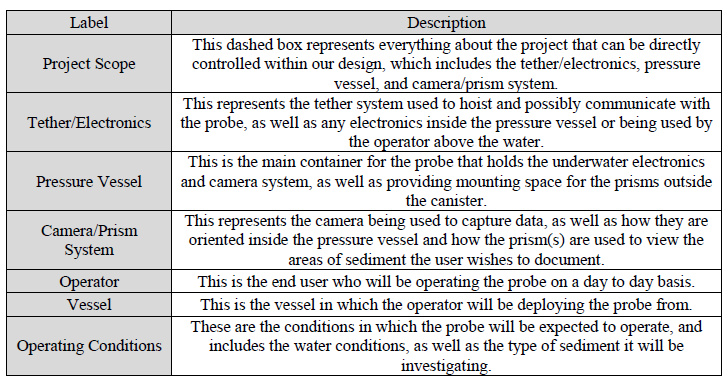
Table 3: List of labels and descriptions within the project scope sketch.
In an attempt to better understand how we can meet these goals, we developed a project scope sketch, as seen below in Figure 15. The sketch is essentially a description of what our design process envisions, as well as what outside factors we need to consider. Table 3 shows a description for all labels within Figure 15, including factors both within the project scope and outside it. The scope of our project, seen as the area surrounded by dashed lines below, includes all aspects of our project design that we can directly control.
MANAGEMENT PLAN
For our project, we opted to split the design responsibilities as according to the three design projects: the camera system, the pressure vessel, and the electrical platform. We felt these design decisions could all be worked on relatively independently until the later stages of the design process. A rough layout of our design timeline can be seen in Appendix 7. As for team management, basic responsibilities were split up equally by person. The responsibilities of each team member are outlined in Appendix 8.
All decisions, both design and management, will be decided by consensus. For design decisions, the leader of each sub group will serve as a moderator during critical design discussions and perform most of the research for the design. They will then present their findings to the group to be discussed and a final consensus reached on the particular subsystem’s design. Management decisions will be made by group consensus, and carried out by the designated member in charge of that section of team management.
DESIGN DEVELOPMENT
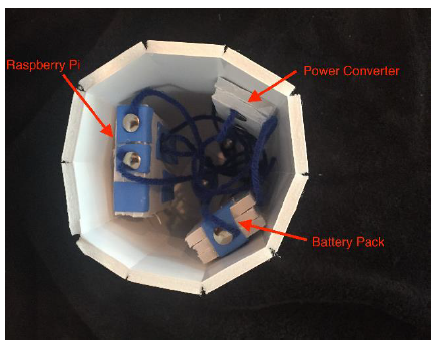
Figure 16: Electronics layout of the circular pressure vessel design.
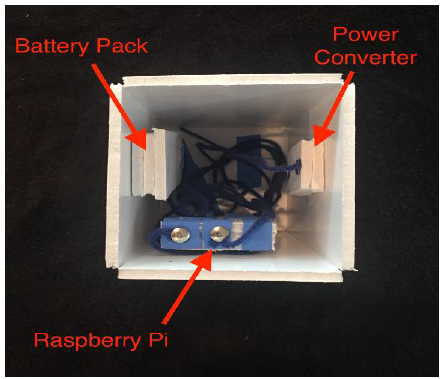
Figure 17: Electronics layout of the rectangular pressure vessel design.
The standard tubing geometries examined were circular tubing and rectangular tubing. Full-size concept models were created out of foam core to demonstrate the differences between the two tubing geometries. See Figure 16 and Figure 17 below for component configuration possibilities for the circular and square tubing respectively made using the foam core models.
PUGH MATRICES
Once we had our lead concepts for the electronics package, pressure housing head design, and the camera system, we needed to decide on the best designs for each subsystem. We used Pugh matrices to do a further trim of ideas to get the top two or three ideas from each subsystem. A Pugh matrix is an idea selection technique which compares different concepts to each other based on the customer’s requirements.
A sketch of each concept in question is displayed along the top row of the matrix and a list of the customer requirements or criterions are listed down the left column. For comparison purposes, one concept is selected as the baseline datum that all the other concepts are judged in relation to. Each concept is judged in relation to the datum for each customer requirement with a “+”, “–”, or “S” referring to better, worse, or the same as the datum, respectively. The sum of each rating is provided at the bottom of the matrix and can be used to rate the concepts to each other.
WEIGHTED DECISION MATRICES
For the top sub system concepts found from the Pugh matrices, we made total system concepts that we evaluated using weighted decision matrices. In our case, we found it made sense to make two separate decision matrices, one for the camera and pressure vessel, and one for the electronics. Our reasoning for this was that the electronics system can be decided more or less independently from the physical systems as they all took about the same amount of physical space, and only really differed in the amount of topside equipment.
TOP DESIGN CONCEPT
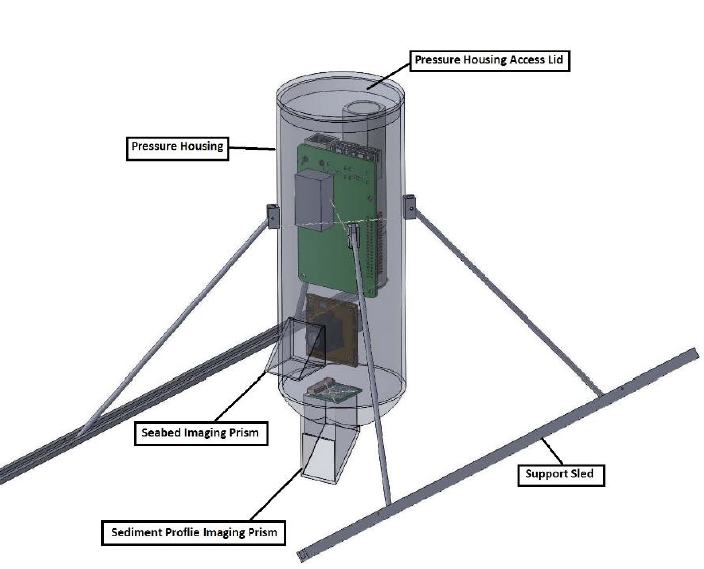
Figure 20: Labeled isometric view of the composite top design.
So, after combining our electronics and physical systems decision matrices, we ended up with the design seen in Figure 20. This took the rounded head pressure vessel with the dual side camera system, and combined it with the topside and bottom side Raspberry Pi electrical system. Overall, while a bit more complicated than some other designs, we felt this design offered a user friendly device that would be more capable of capturing useful data than a simpler solution. While it should be noted that more indepth testing may reveal flaws in this design that necessitate redesigning, this is a good overall vision of what we plan to build.
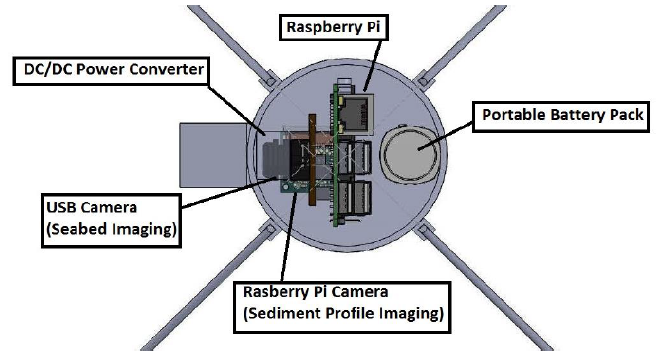
Figure 22: Labeled top view of the composite top design.
Figure 22 shows that, while a bit cramped, there is enough space horizontally to fit all of our components. Should we need more space, likely due to wiring needs, larger sizes of tubing are readily available from online merchants that we can use instead without impacting the overall design of the pressure vessel. This decision will be made later in our critical design once we have sourced our electronics and know exactly how much space we will need.
FINAL DESIGN
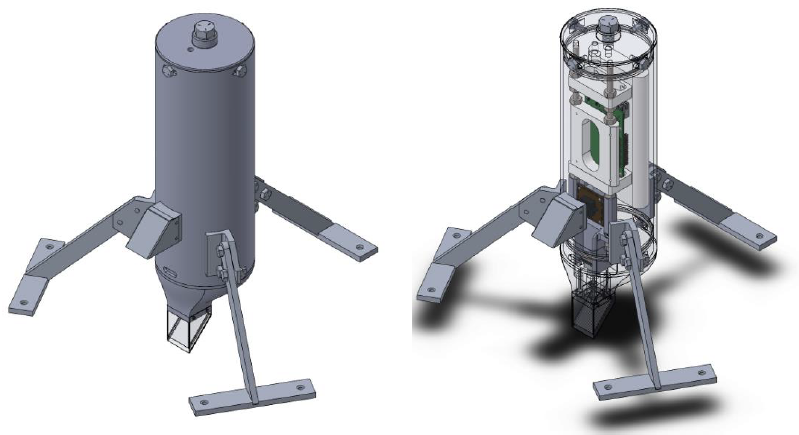
Figure 23: Fully assembled solid and transparent models of the Micro SPI.
After finishing the details of our final solid model, we ended up with the following design, seen fully assembled in Figure 23 below. All drawings for individual parts and sub-assemblies can be seen in Appendix 25.
While this is the design we are currently using for final design, we also have 3 other head shape designs based on the rounded head shape that feature different contours than shown in Figure 25. We have had all four designs 3D printed at the innovation sandbox, ready to be tested in a similar manner as our earlier head shape testing. Unfortunately, due to a storage mishap our testing fish tank was broken shortly before we had planned to do the final tests on our 3D printed head shapes.
JUSTIFICATION AND ANALYSIS
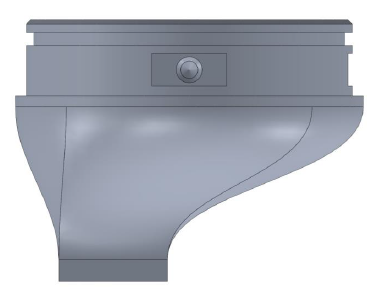
Figure 26: Final design head shape.
As for how we decided on a final design for a head shape that would disturb the sediment as little as possible, we mostly based our design on our original head shape testing. As seen in Appendix 10, the rounded head shape by far had the lowest amount of disturbance when plunged into the sand. Likewise, the extension of the prism vertically away from the main pressure vessel housing reduced the bow wake and thus caused less disturbance of the sediment under examination. Therefore, our final head shape was of a rounded design that still fit with our other design requirements, as seen below in Figure 26.
MANUFACTURING
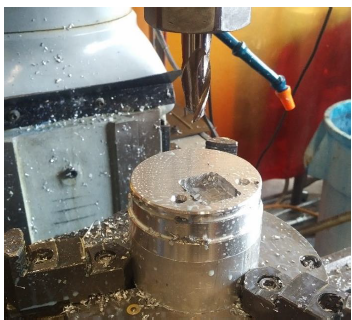
Figure 30: Camera slot being machined.
The raspberry pi camera slot of the lower cap should be machined on a 3 axis mill by hand. The slot takes a considerable amount of time to machine, and will be dependent on the tools available. Since we only had a ½” end mill long enough to cut the full 1 ½” depth, the corner fillets were pre-drilled using a smaller standard drill bit, and then the rest of the material was cut using the endmill, as seen below in Figure 30.
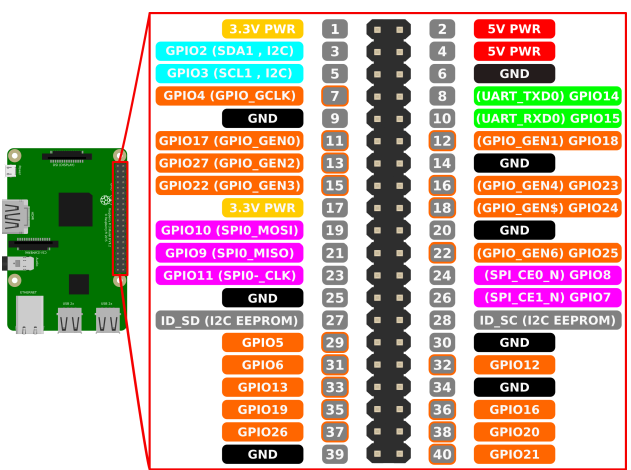
Figure 36: Raspberry Pi Pin Layout.
Also be careful to connect wires to the correct pins on the Raspberry Pi. The circuit diagrams in Appendix 20 label pins by their sequential board number. In software, however, these pins are referred to using BCM notation, which is the number appearing after GPIO_ on their labels, as shown below in Figure 36. If wires are connected to the wrong pins, then the device will not work.
DESIGN VERIFICATION
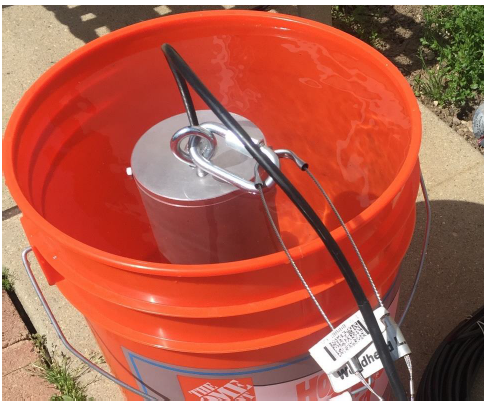
Figure 38: Pressure vessel bucket test.
In this test, we found that the pressure vessel is water tight in shallow water for several hours, as seen in Figure 38. We also found that it does not spring any leaks at approximately 10m of depth over the course of a few minutes. One thing to note is we found that water can wick through the external LED wires. If the wire casing is nicked or the epoxy is cracked, water may be able to find it’s way into the pressure vessel slowly. Fortunately, the leak is slow enough that it should be visible in the lower camera’s field of view before the water gets high enough to damage electronics.
CONCLUSION
After a significant amount of work on manufacturing, testing, and programming, we ended up with a functional prototype of the Micro SPI, as seen below in Figure 40.
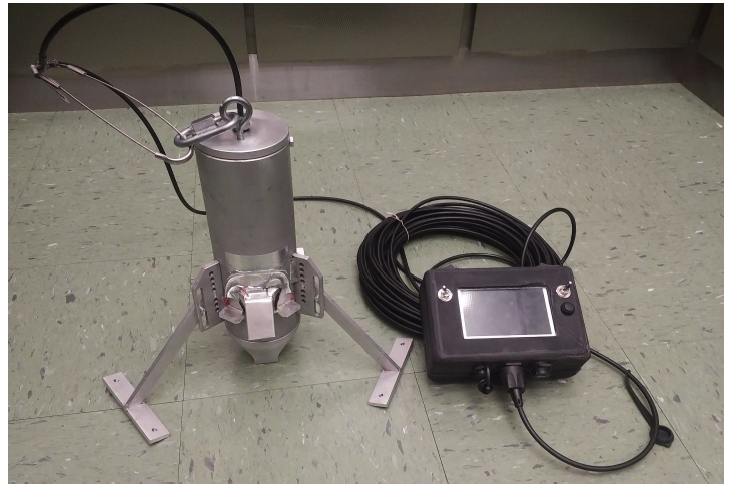
Figure 40: The completed Micro SPI prototype.
We managed to include the vast majority of the desired features in this prototype, and have laid the framework for adding additional functionality if it is so desired. First off, the SPI probe is entirely waterproof, with no signs of leaks during our tests to 10m. It also has the dual camera system that allows for both a top down and cutaway view of the sediment. Both cameras have a roughly 1 inch viewing area with a viewing resolution near 600 DPI, although the actual resolution is unknown.
The controller is able to power on both itself and the probe, and send commands to the probe over the Ethernet cable. The controller has a gasket seal and should be splash proof, although the porous nature of the 3D printed material will limit that unless is receives some sort of coating. The controller has switches to toggle between a live view and review mode where previously captured images can be seen. The images themselves are captured simply with a push button, which automatically illuminates four LEDs mounted flush in the lower cap to light the profile view imaging area and capture and image.
There are also two high powered LEDs mounted on external flanges that are always on to indicate the device in powered on, and to provide enough light for the live view. The top down view prism, mounted on the side of the device, is permanently affixed to the side of the pressure vessel in order to securely hold the external LEDs in place. The lower profile view prism is attached with 3 nylon screws, which are designed to shear off before causing damage to the threads that hold the prism in place.
This allows the prism to be replaceable should it become scratched or cracked, and prevents the threads in the difficult to machine end cap from wearing out over time from hard impacts. The landing legs are adjustable in height to allow the device to be tuned for use in various sediment conditions, and to control the depth of the prism penetration. The landing legs have threaded holes to allow additional weights to be mounted should the device be too light to properly penetrate the sediment.
Source: California Polytechnic State University
Authors: Caleb T. Davies | Andrew P. Corvin | Matt R. Ferrari
